Software for Windows 10 and 11 · Mac version coming soon · made in Bergues, France

FFSMC Cross Stitch Lab, from photo to cross-stitch chart

Flowers from the garden, the cat on the sofa, an old wedding photo: choose the picture, and Cross Stitch Lab picks the DMC, Anchor, Madeira or Ariadna threads closest to its colours and draws the chart square by square. You see the finished piece before you’ve even threaded the needle.

See the finished piece before the first stitch.

Every feature unlocked during the trial. · From €79.00 lifetime licence, 1 computer

  • Lifetime licence
  • DMC, Anchor, Madeira, Ariadna
  • Email support within 48 h
  • 7 languages
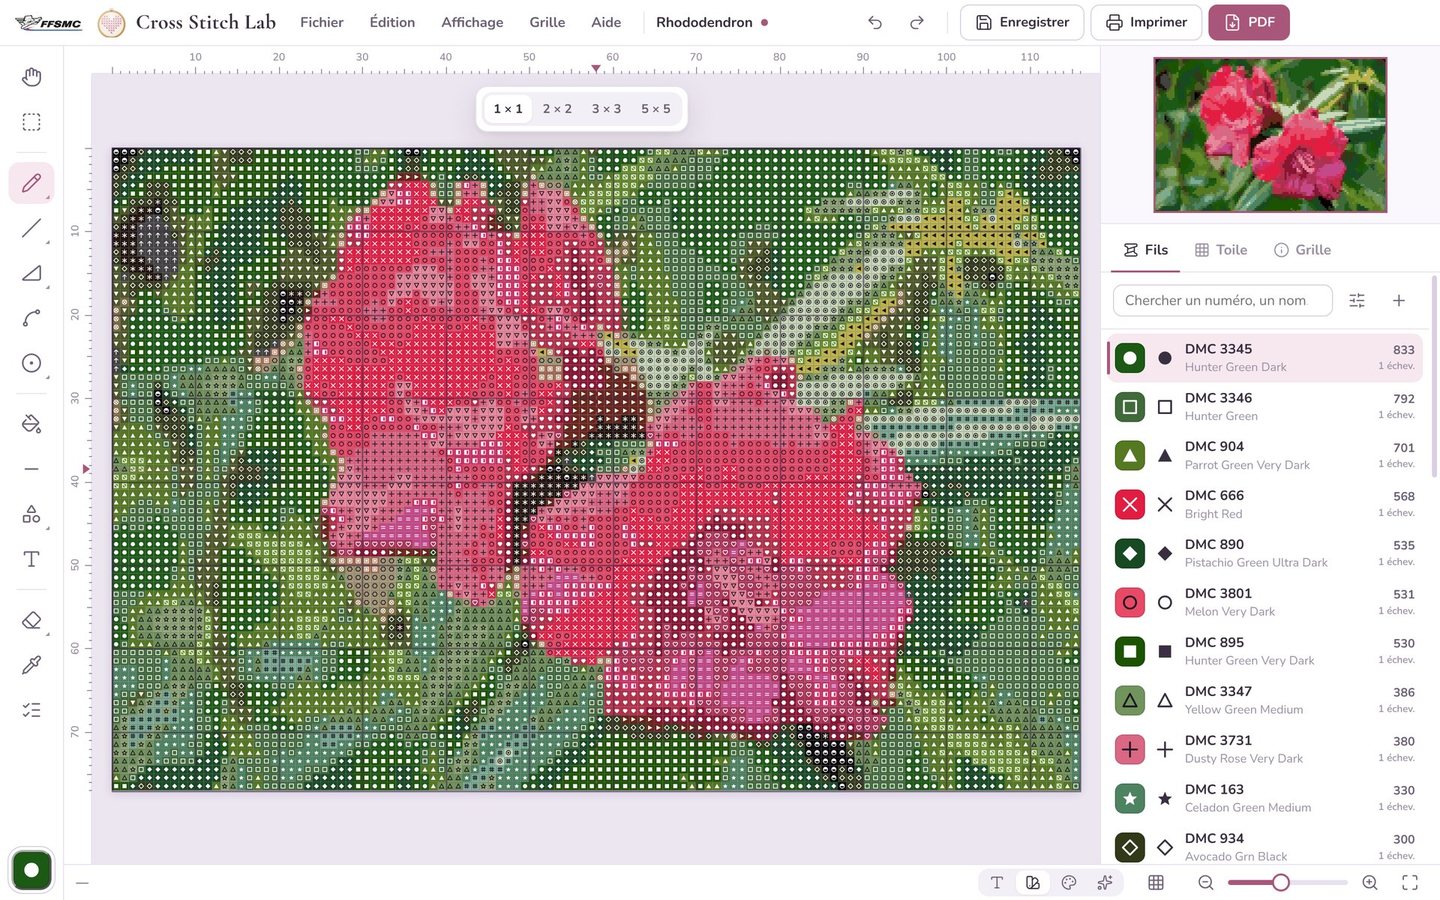
The chart editor and its DMC thread list, with stitch and skein counts

What Cross Stitch Lab does

A four-step wizard to go from photo to chart, then a proper workroom to refine it, follow your progress and print it.

Step by step

From photo to chart, in four steps

Photo, Style, Size and fabric, Threads: the wizard takes you through these four steps, and you can go back to any of them by clicking its name, without losing anything. On the right, the preview shows the prepared photo, the chart, or a simulation of the stitched piece, stitch by stitch, on the fabric you chose.

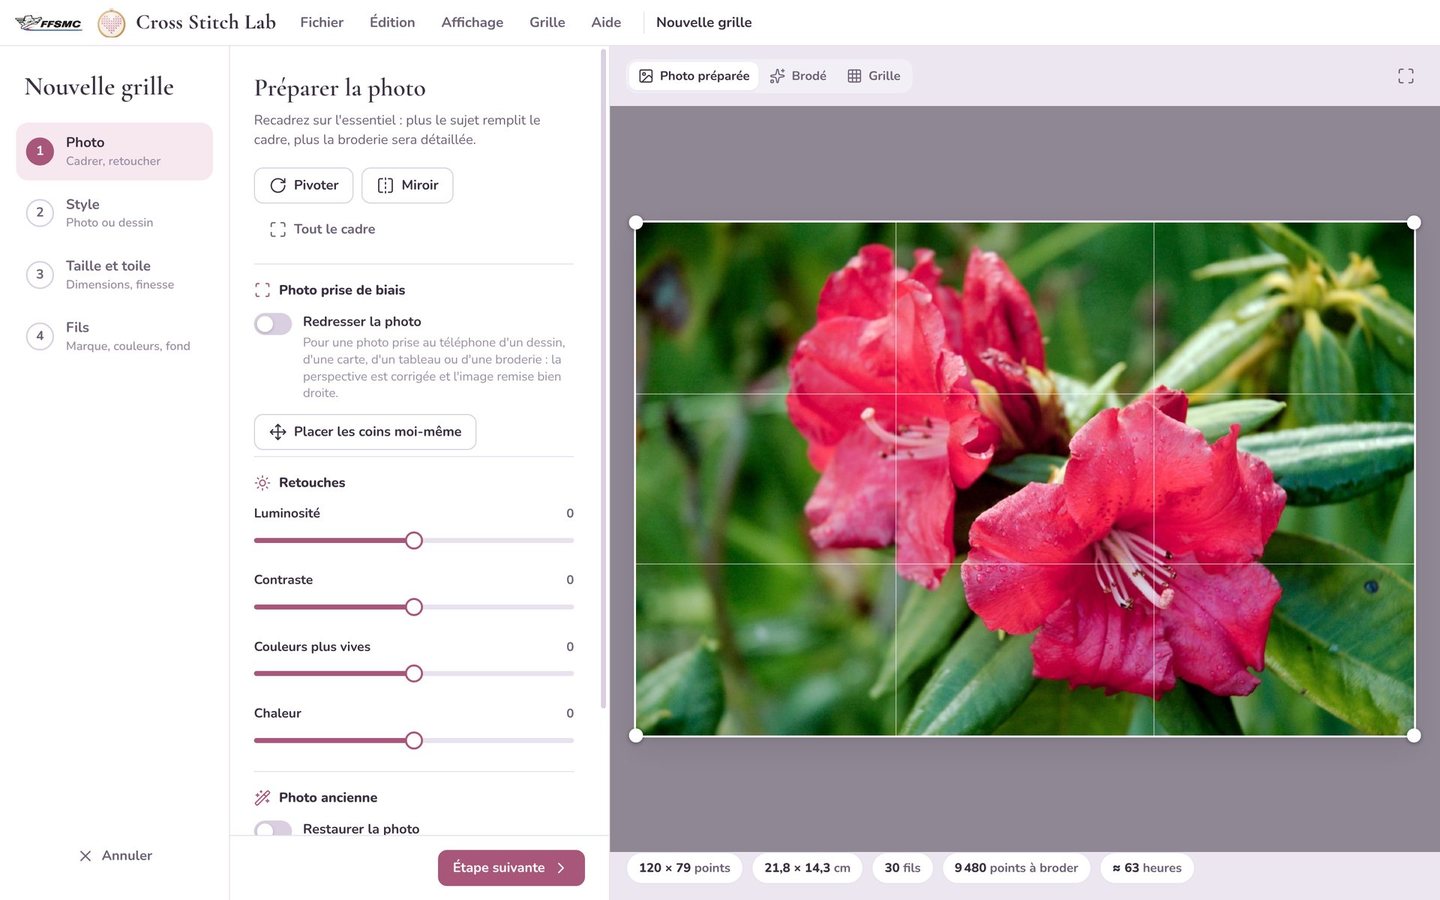
A card, a painting or an embroidery photographed at an angle with your phone is straightened by itself. Four sliders adjust brightness, contrast, colour vividness and warmth.

  • Under the preview: size in stitches and centimetres, number of threads, of stitches and estimated time
  • Crop, rotate, mirror
  • Subject cut-out, the background stays as bare fabric
  • Faces taken care of: eyes, nose and mouth keep their colours

In every edition

Photo step: crop, straighten and touch up the photo before conversion

Nineteen styles

Your photo as it is, or as a drawing

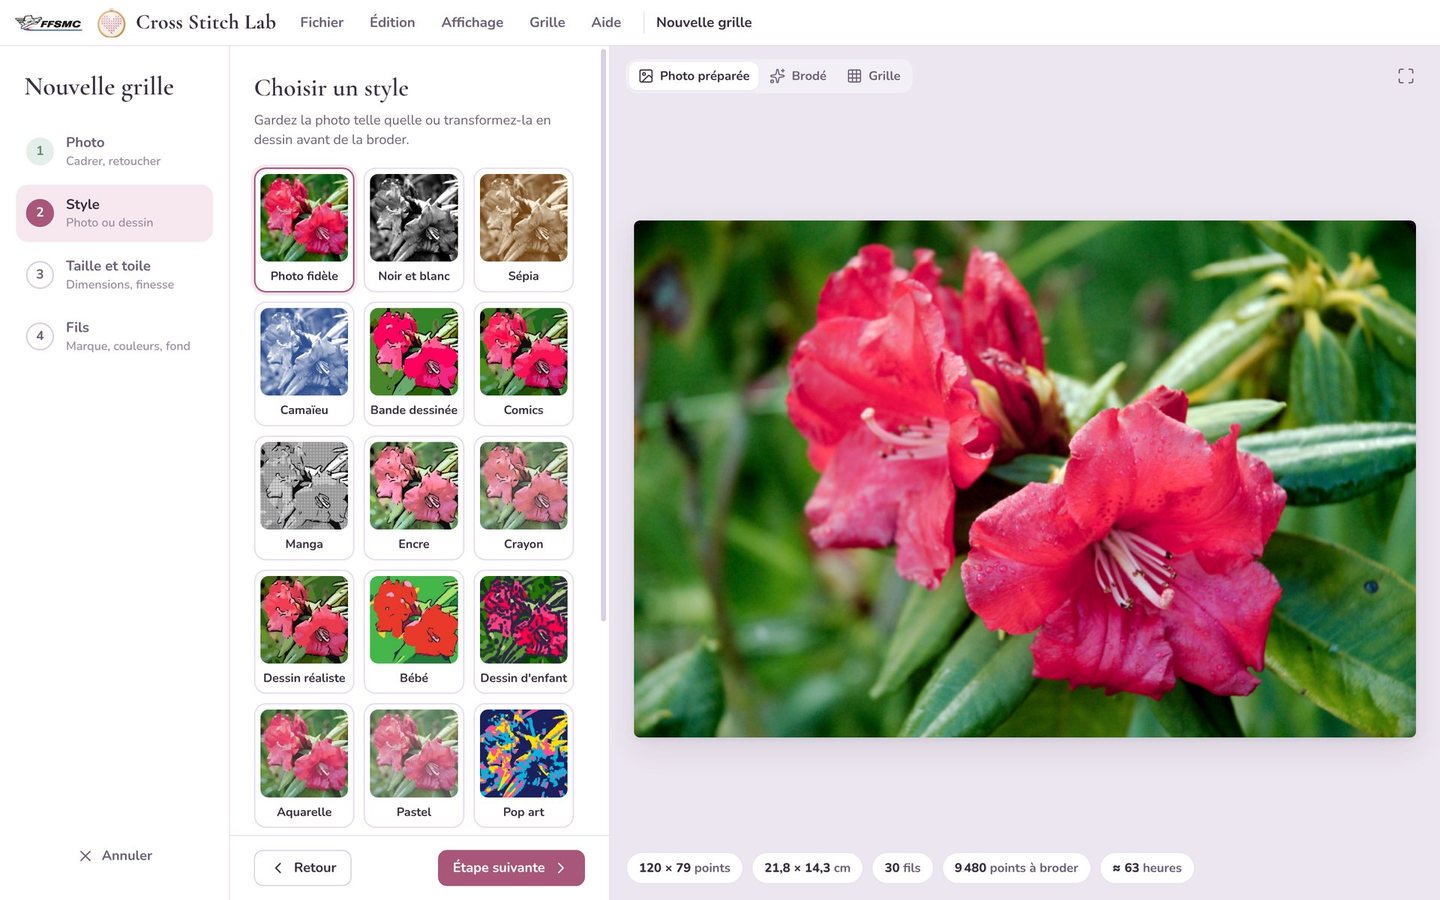
Keep the photo true to life, or turn it into a comic strip, a watercolour, stained glass, a child’s drawing, a manga page. Each thumbnail shows your own photo in that style: one click is all it takes to try it.

For styles that draw outlines, those outlines can be stitched in backstitch, as fine lines over the crosses. It’s the look of commercial “comic” charts.

  • True photo, black and white, sepia, monochrome
  • Comic strip, comics, manga, ink, pencil, realistic drawing
  • Baby, child’s drawing, watercolour, pastel
  • Pop art, stained glass, pixel art, silhouette, outlines only

True photo in every edition, the other eighteen styles in Complete and Studio

Style step: each thumbnail shows your photo in that style

Family photos

Old photos get their colours back

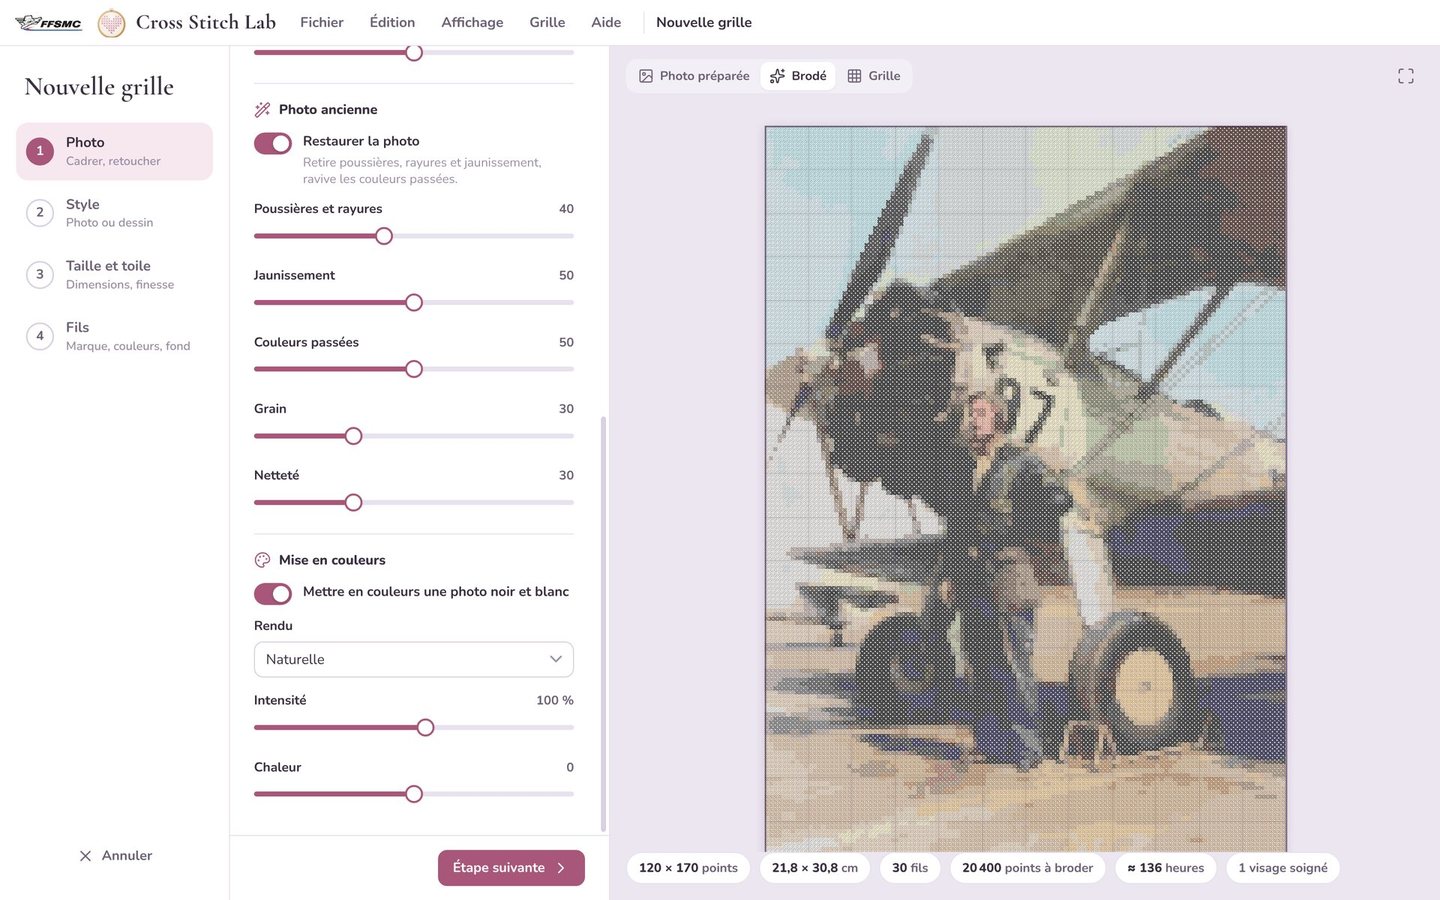
A yellowed, scratched, faded photo: restoration removes dust and scratches, takes away the yellowing, revives the colours, softens the grain of the photo paper and brings back crisp outlines.

A black-and-white or sepia photo can then be colourised, with four renderings to choose from. The real colours were lost long ago: the software suggests plausible ones, and you remain free to change a thread.

  • Five restoration sliders
  • Natural, Vivid, Other interpretation or Soft, vintage rendering
  • Adjustable intensity and warmth

Complete and Studio editions

An old photo of a biplane, restored and colourised, in the stitched preview

Fabric and framing

Planned for the frame from the start

Choose the fabric and its count, and the software does the arithmetic: the real size of the embroidery, in centimetres, and the number of strands to use.

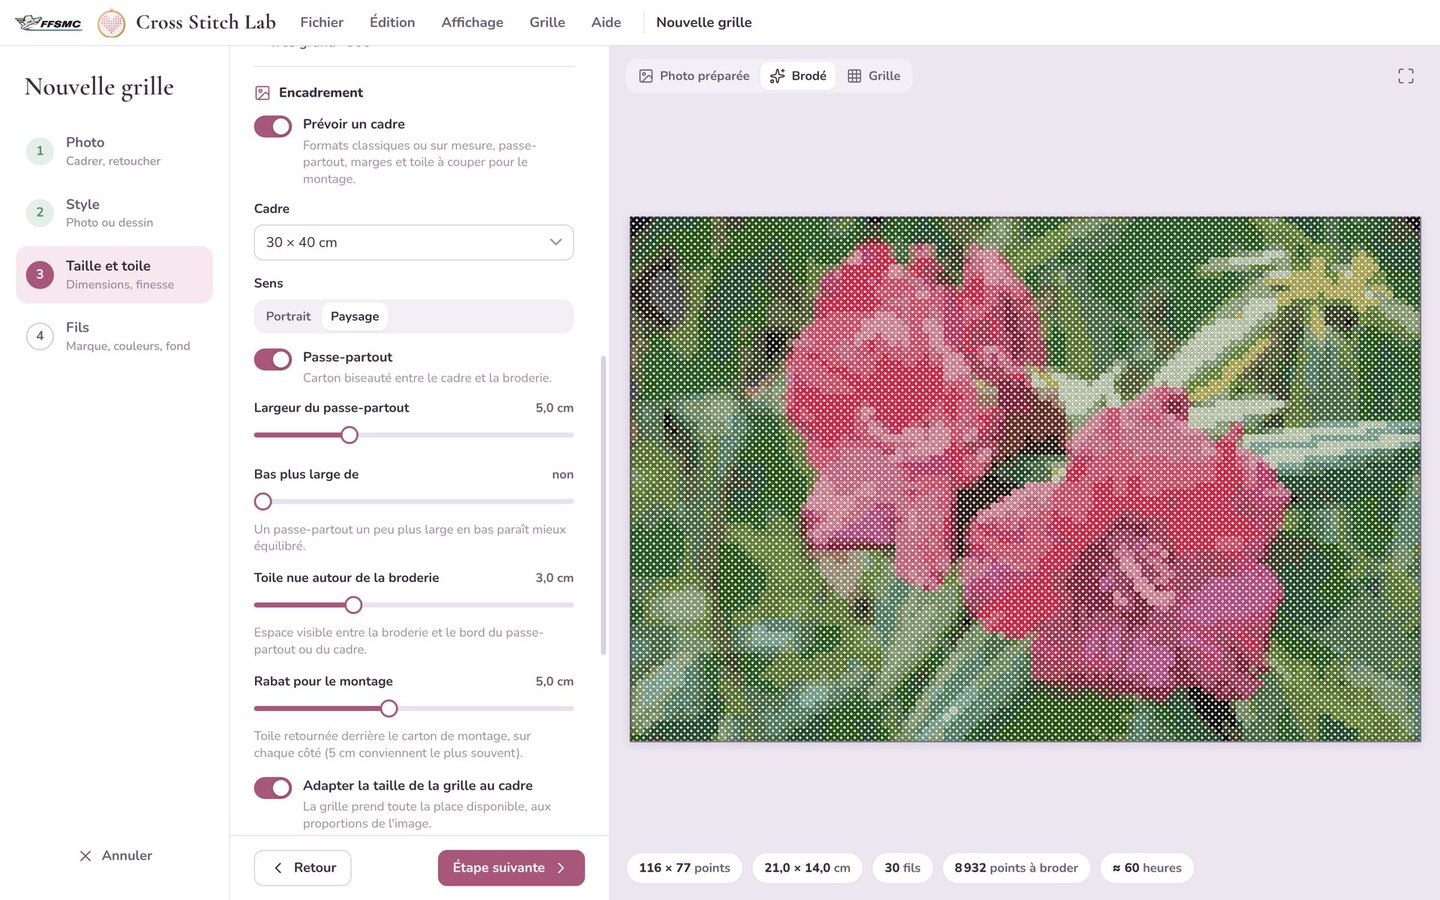
Already know which frame the embroidery will go into? Enter its size, the mount, the bare fabric around and the turnover: the diagram gives you the space for the embroidery and, in bold, the piece of fabric to cut. The chart can even take all the space available in the frame.

  • Aida, evenweave, linen, Hardanger, canvas, plastic canvas, over 1 or 2 threads
  • Fifteen fabric colours
  • Standard, inch, round, oval or custom frames
  • Mount, bare fabric and turnovers included

In every edition

Size and fabric step: a 30 × 40 cm frame with mount, bare fabric and turnover

The editor

A proper workroom to refine the chart

The chart opens in the editor, with its rulers, thicker lines every ten stitches and the centre marked by two pink arrows. You place, erase and move stitches just as on graph paper.

As you stitch, mark what is done: the stitches are covered with a sage-green veil and the Chart tab shows the percentage stitched.

  • Cross stitch, half stitch, quarter and three-quarter stitches
  • Backstitch, French knots and beads
  • Fill, lines, shapes, cross-stitch text
  • Selection, copy and paste, mirror, rotate
  • Your last 120 actions can be undone

In every edition

The chart editor and its DMC thread list, with stitch and skein counts

Threads and printing

Your threads, the shopping list and the PDF

Record the skeins you own: the software can make a chart with those alone, and the shopping list only contains what is missing. Stitching with another brand? The chart converts, with the quality of the match for each thread.

The PDF is your working chart: a cover with the stitched preview, the thread key, the page plan, the chart split into readable pages and a shopping checklist to take to the haberdashery.

  • Equivalents between DMC, Anchor, Madeira and Ariadna
  • Thread length and number of skeins for each colour
  • Chart in black symbols or in colour
  • A4, A3 or Letter paper, squares from 2 to 6 mm

In every edition

Cross Stitch Lab on video

A few minutes to see the software at work, from photo to chart.

Cross Stitch Lab presentation

The video is hosted by YouTube. It only loads, and YouTube only receives anything, if you click.

Born at home, for a stitcher

Cross Stitch Lab was first developed for its creator’s wife, a passionate stitcher. It speaks the language of embroidery: fabric, strands, skeins, mounts.

A lifetime licence

Bought once, with no subscription: the software is yours. Updates are free for one year.

It works offline

The internet is only needed to activate the licence and check it from time to time, download the colourising engine and look for updates.

Nothing gets lost

Each chart keeps the original photo and the wizard settings with it. If you close without saving, the software offers to save.

Real help

The illustrated user manual is built into the software, on the F1 key. And support replies within 48 working hours at [email protected].

Three editions, one lifetime licence

Bought once, with no subscription. Updates are included for one year.

Essential

Charts that stay true to your photos.

€79.00 lifetime licence

For 1 computer. To stitch your photos just as they are.

  • 4-step wizard and stitched preview
  • DMC, Anchor, Madeira, Ariadna shade cards
  • Every fabric and framing
  • Angled photos straightened, cut-out
  • Complete editor, threads, shopping list and PDF
See this edition

Recommended

Complete

Every feature.

€149.00 lifetime licence

For 1 computer. The edition we recommend.

  • Everything in the Essential edition
  • The nineteen styles: comic strip, manga, watercolour, pop art…
  • Outlines stitched in backstitch
  • Restoration of old photos
  • Colourising of black-and-white photos
See this edition

Studio

The Complete edition, on three computers.

€199.00 lifetime licence

For 3 computers at once: home, laptop, workroom, or the stitchers in the family.

  • Everything in the Complete edition
  • Installed on 3 computers at once
See this edition

Several computers? The Studio edition covers three with a single licence. After a year, the software is still yours and keeps working: only the free updates stop.

The detailed comparison
FeatureEssentialCompleteStudio
4-step wizard, realistic stitched preview
DMC, Anchor, Madeira, Ariadna shade cards and equivalents
Every fabric, framing, complete editor, PDF
Straightening of photos taken at an angle, cut-out
Thread stash and shopping list
Nineteen artistic styles (comic strip, manga, watercolour, pop art…) —
Outlines stitched automatically in backstitch —
Restoration of old photos —
Colourising of black-and-white photos —
Three computers instead of one — —
Edition €79.00€149.00€199.00

Try Cross Stitch Lab

Download the installer, double-click it and follow the steps: installation takes two minutes. You then have seven days with every feature to make your first charts. On first launch, Windows may show “Windows protected your PC”: click “More info”, then “Run anyway”. The program is signed in the name of Christophe Queyroi.

Windows Mac · soon Buy a licence

Version 1.1.0 273.1 MB Windows 10 et 11 (64 bits)

Requirements

  • Windows 10 or 11, 64-bit
  • 8 GB of memory recommended
  • A screen of at least 1366 × 768 recommended
  • About 600 MB of disk space, plus 1 GB for colourising
  • An internet connection to activate the licence

Tips and tricks

The little things in the manual you don’t spot straight away, and that make all the difference once you know them.

  1. Drop the photo onto the window

    Drag a photo from File Explorer and drop it anywhere on the window: the wizard opens straight away with it. A .stitchlab chart dropped the same way opens directly in the editor.

    Where Home screen

  2. Crop tight

    The more the subject fills the frame, the more stitches it gets and the more detailed the embroidery. A portrait cropped on the face gains enormously in finesse.

    Where Wizard › Photo › white frame on the preview

  3. Place the corners yourself

    If a photo taken at an angle wasn’t straightened, drag the four dots onto the corners of the document, then confirm. Next time, lay the document flat on a plain, contrasting surface, photograph the whole of it and avoid reflections from the lamp.

    Where Wizard › Photo › Photo taken at an angle › Place the corners myself

  4. Remove the white border

    The white edge of a card or photo print doesn’t need stitching. Remove the plain border takes it off.

    Where Wizard › Photo › Photo taken at an angle › Remove the plain border

  5. Double-click resets a slider

    Gone too far with brightness or warmth? Double-click the slider and it goes back to zero.

    Where Wizard › Photo › Touch-ups

  6. Judge by the Stitched preview

    It’s the one that shows the real result, seen from a distance, on the fabric you chose. Switch between Prepared photo, Stitched and Chart before creating the chart.

    Where Wizard › buttons above the preview

  7. Outlines in backstitch

    With a style that draws outlines, the Lines in backstitch option turns the black outlines into fine lines stitched over the crosses, much crisper. It’s the look of commercial “comic” charts.

    Where Wizard › Threads › Finishing touches › Lines in backstitch (Complete and Studio)

  8. Clean up stray stitches

    A single stitch in the middle of another colour means stopping and starting your thread. Set Stray stitches to Clean up, More or A lot: stitching will be far more pleasant.

    Where Wizard › Threads › Finishing touches › Stray stitches

  9. Remove colours that barely appear

    A thread used for only a few stitches is a skein bought for nothing. The Remove colours with fewer than setting gets rid of those threads.

    Where Wizard › Threads › Finishing touches

  10. Stitch from your stash

    Record your skeins once in My threads. Then turn on Only the threads I have: the chart is made solely with what you own.

    Where File › My threads…, then Wizard › Threads

  11. Spot everywhere a thread is used

    Click a thread’s eye: all the others fade, and you see at a glance where it is stitched.

    Where Editor › Threads tab › the thread’s eye

  12. Merge twin shades

    Two almost identical threads in the chart? Merge them: all the stitches of the first go to the second, and that’s one skein less.

    Where Editor › Threads tab › right-click › Merge with another thread…

  13. Replace a colour everywhere at once

    With the Fill tool, Shift + click replaces that colour throughout the chart with the current thread.

    Where Editor › Fill tool (F key)

  14. Right-click erases

    With most tools, a right-click does the opposite of a left-click: it erases instead of placing. No need to change tools to fix a mistake.

    Where Editor › toolbar on the left

  15. Space bar to move around

    Hold down the space bar: the mouse moves the view, whatever the current tool. Keys 1 to 4 switch display modes, from Symbols to Stitched preview.

    Where Editor

  16. Copy from one chart to another

    A border, a motif, a name: copy and paste works between two charts, and missing threads are added automatically to the destination chart.

    Where Editor › Selection tool (S key)

  17. Legible text

    Below 8 stitches high, use a simple bold font such as Arial or Verdana. Handwriting fonts need at least 14 to 16 stitches to stay legible.

    Where Chart › Cross-stitch text…

  18. Mark a whole area in one click

    With the Mark as stitched tool, Shift + click marks a whole area of the same colour at once. Right-click unmarks.

    Where Editor › Mark as stitched tool (M key)

  19. Repeat a few rows between pages

    In the PDF, 1 to 5 greyed rows can be repeated at the edge of the pages: much easier to find your place where pages join.

    Where File › Export as PDF… › Layout

  20. The evening look

    A dark interface, restful for the eyes when you’re working on your chart after dinner.

    Where View › Evening look
A stitcher’s good habits

With or without Cross Stitch Lab, these habits make for lovely embroidery. They come from the little stitcher’s guide in the user manual.

  • A good photo first

    A sharp subject, well lit in daylight, filling the picture, with clear contrasts. A blurred or tiny photo will rarely make a lovely chart.

  • Few colours to start with

    Start with 25 to 35 colours and only add more if the shading lacks finesse. Fewer colours mean a simpler chart and less shopping.

  • The right number of strands

    On 14 or 16-count Aida, or 28-count evenweave over 2: 2 strands for cross stitch, 1 for backstitch, tapestry needle size 24 to 26. The coarser the fabric, the more strands you need.

  • Cut the fabric generously

    The stitched size plus at least 5 cm on each side, or the fabric to cut your frame calls for. Overcast the edges so they don’t fray.

  • Start in the centre, always cross the same way

    Fold the fabric in four to find the centre and start there. Top arms all facing the same way give an even embroidery.

  • Backstitch last, and no knots

    Outlines are stitched at the end, on top of the crosses. Secure your threads by sliding them under a few stitches on the back rather than with a knot.

Your questions, our answers

What people wonder before buying, and what they wonder once the needle is threaded. Type a word to find your answer, or pick a topic.

Before buying

What does Cross Stitch Lab do, in a nutshell?

It turns a photo into a cross-stitch chart ready to stitch. You choose the picture, the software prepares it, picks the threads closest to its colours from your brand’s shade card and draws the chart square by square. You can then edit it and print it with its key and shopping list.

I’m new to cross stitch. Is it for me?

Yes. The wizard takes you through four steps (Photo, Style, Size and fabric, Threads), and you can go back to any of them by clicking its name without losing anything. The software recommends the number of strands and the needle size for your fabric, and the built-in manual includes a little stitcher’s guide.

Which edition should I choose?

The Complete edition, for most of you: it has everything, including the artistic styles, old photo restoration and colourising. The Essential edition is enough if you mainly want charts that stay true to your photos: it has the True photo style, every shade card, every fabric, framing, the editor and the PDF. The Studio edition is the Complete edition on three computers.

Can I try it before buying?

Yes, for seven days, with every feature unlocked and no limits. The days left are shown in a small pink badge at the bottom of the home screen.

What happens at the end of the trial?

The software only shows a screen with two buttons: activate a licence you have bought, or buy one. Your saved charts stay on your computer, and you will find them untouched as soon as your licence is activated.

Does it work on a Mac?

No. Cross Stitch Lab is made for Windows 10 and Windows 11, 64-bit. The PDF charts, on the other hand, open anywhere, on a Mac or a tablet.

Do I need to be online?

Only to activate the licence, download the colourising engine and find out whether a new version exists. The software also checks the licence from time to time. The rest of the time, it works offline.

Which languages is it in?

Seven: French, English, Spanish, German, Italian, Polish and Brazilian Portuguese. Change the language in File › Settings… The user manual is available in English and French.

Photos and styles

Which photo makes a lovely embroidery?

A sharp, well-lit subject, in daylight and without backlighting. A subject that fills the picture: an embroidery is rarely more than 200 stitches wide, and small details in the distance disappear. Clear contrasts: a ginger cat on a blue sofa stitches better than a grey cat against a grey wall. A phone photo is plenty; avoid tiny pictures picked up on the internet.

I photographed a card or a framed embroidery slightly at an angle.

The software notices by itself: a few seconds after opening, it finds the four corners of the document and sets the picture straight. If it doesn’t manage, click Place the corners myself and drag the four dots onto the corners. If the picture looks stretched, choose its real format under Document proportions.

Can I stitch an old, damaged family photo?

Yes, with the Complete and Studio editions. Turn on Restore the photo: five sliders handle dust and scratches, yellowing, faded colours, the grain of the photo paper and sharpness.

And colourise a black-and-white photo?

Yes, with the Complete and Studio editions. The first time, the software downloads its colourising engine (about 935 MB, only once). You then choose the rendering: Natural, Vivid, Other interpretation or Soft, vintage. Bear in mind that the real colours of a black-and-white photo are lost: the software suggests plausible ones, and you can always change a thread afterwards.

What are the nineteen styles?

True photo, black and white, sepia, monochrome, comic strip, comics, manga, ink, pencil, realistic drawing, baby, child’s drawing, watercolour, pastel, pop art, stained glass, pixel art, silhouette and outlines only. Each thumbnail shows your own photo in that style: one click is all it takes to try it. True photo is in every edition; the other eighteen are in the Complete and Studio editions.

I want to stitch a portrait of my grandchildren. Any advice?

Crop tight on the face, keep Take care of faces on (it preserves the eyes, nose and mouth) and plan at least 120 stitches wide. Always compare with the Stitched preview before creating the chart.

My photo is very busy. What can I do?

Try a drawn style: comic strip, manga or comics simplify busy photos and give charts that are easier to stitch, with large areas of colour that stitch up faster.

Fabric, size and threads

How many colours should I choose?

Anything from 2 to 120. Fewer colours mean a simpler chart and less shopping; more colours give finer shading. Between 20 and 40 usually gives a very beautiful result. For a photo, start with 25 to 35 colours and increase if the shading lacks finesse.

Which fabrics are covered?

Aida (6 to 28 stitches per inch), evenweave, linen, Hardanger, canvas, plastic canvas, and Other fabric, where you type your own count. Evenweave, linen and Hardanger can be stitched over 2 threads or over 1. You also choose the fabric colour from fifteen shades, from white to black: the stitched preview takes it into account and the software avoids threads too close to the fabric.

What size should my embroidery be?

Give the width in stitches or centimetres, and the height follows. As a guide: 60 to 80 stitches for a card or a small frame, a few evenings; 120 stitches for a lovely picture, a few weeks; 200 stitches and more for a large, very detailed piece, several months. The software shows the size in centimetres and the estimated time.

Which thread brands are included?

DMC (the 489 colours of Mouliné Spécial), Anchor (445), Madeira (369) and Ariadna (375). Each thread shows its equivalents in the other brands, rated identical, very close, close or approximate.

I stitch with Anchor and my chart is in DMC.

Open Chart › Convert to another brand… and choose the brand: a table shows each thread and its replacement, with the quality of the match. Click Convert; the symbols do not change.

Can I make a chart using only the threads I already have?

Yes. Record your skeins in File › My threads…, then turn on Only the threads I have on the Threads step of the wizard. That way you stitch from your stash without buying anything.

How many skeins should I buy?

The shopping list works it out for each thread, taking into account the fabric, the number of strands and an allowance for starts and finishes. It also shows what you already have and what is missing, and prints with boxes to tick at the shop.

The colours on screen don’t quite match my threads.

That’s normal: every screen shows colours in its own way. The matches are calculated from the manufacturers’ reference values. Trust the thread reference, and check on the brand’s printed shade card if needed: it remains the reference.

I don’t want to stitch the background.

On the Threads step, choose Subject only: the person, animal or object is found automatically and the background stays as bare fabric. For a plain-coloured background, No plain background leaves that colour unstitched, and the Tolerance sets how far neighbouring shades count as background.

Framing

I’ve already bought my frame. Can the software allow for it?

Yes. On the Size and fabric step, turn on Plan a frame and choose its size: standard sizes from 10 × 15 to 70 × 100 cm, A4, A3, A2, inch sizes, round and oval frames, or Custom size… to type the inside dimensions. With Fit the chart size to the frame, the chart takes all the space available.

What piece of fabric should I cut?

The software shows it in bold under the diagram: the fabric to cut, which is the frame view plus a turnover on each side. It depends on the frame, not on the size of the embroidery. For a 30 × 40 cm frame with a 5 cm turnover, for instance, you need 40 × 50 cm of fabric. Always cut at least that size, even if it means trimming when mounting.

What if I add a mount?

Turn on Mount and set its width, from 1 to 15 cm. The Wider at the bottom by option widens the bottom band, which looks better balanced to the eye. The software immediately works out the space left for the embroidery.

My chart is already made. Can I still plan the frame?

Yes: in the editor, open Chart › Framing… or the Plan a frame… button on the Fabric tab. The window suggests the frames that fit your embroidery, from smallest to largest. The framing then appears on the first page of the PDF.

Editing and following your work

Can I change the chart once it’s created?

Yes, stitch by stitch. The editor has cross stitch, half stitch, quarter and three-quarter stitches, backstitch, French knots and beads, fill, lines and shapes, text, and selection with copy and paste, mirror and rotate. You can also replace a thread, merge two or change a symbol.

I want to add a name and a date.

First choose the thread, then the Text tool (T key) or Chart › Cross-stitch text… Type your text, on one or several lines, choose from eighteen fonts, the height in stitches, bold or italic, then click Place on the chart.

Can I design a motif without starting from a photo?

Yes: on the home screen, click Design on a blank chart. Give a title, the width and height in stitches, the fabric, its count and its colour. The empty chart opens with a dozen basic threads from your favourite brand.

I made a mistake.

Ctrl + Z undoes, Ctrl + Y redoes: the software remembers your last 120 actions. And with most tools, a right-click erases instead of placing, without changing tools.

How do I keep track of where I am in my stitching?

Take the Mark as stitched tool (M key) and go over the stitches you have done: they are covered with a sage-green veil. The Chart tab shows the percentage stitched. No more pencil or highlighter.

I edited my chart, then redid the conversion: my changes have gone.

That’s normal, the conversion recalculates the whole chart. Press Ctrl + Z to go back, or reopen the saved version. To try a variant safely, first save a copy with File › Save as…

Printing and sharing

What’s in the PDF?

A cover with the stitched preview and the fact sheet (size, fabric, threads, stitches, strands, frame and fabric to cut), the thread key, the page plan, the chart in black symbols and, if you wish, in colour, a full-page stitched preview, the shopping checklist and your notes. A4, A3 or Letter paper, squares from 2 to 6 mm.

The printed chart isn’t the right size.

In your PDF reader’s print window, choose Actual size or 100 %, not “Fit to page”. The squares then keep exactly the size you chose.

I don’t have a printer.

It isn’t compulsory: the chart is just as easy to read on a tablet. You can also send the PDF to a friend.

How do I read the printed chart?

Each square is a cross stitch, stitched with the thread whose symbol appears in the key. A triangle is a three-quarter stitch, a diagonal half-square a half stitch, coloured lines are backstitch to be stitched last, and circles are French knots or beads. The pink arrows at the edges of the pages mark the centre, where you start.

Licence and purchase

Is it a subscription?

No. The licence is bought once, with no subscription, and the software is yours with no time limit. Updates are free for one year after purchase.

How much does each edition cost?

Essential €79, Complete €149, Studio €199. The Essential and Complete editions install on one computer, the Studio edition on three.

How do I receive and activate my key?

Your key arrives by email right after payment; you will also find it in your customer account on ffsmc.fr, under My licences. Open Help › Licence… in the software (or click the badge on the home screen), paste the key and click Activate, with the computer connected to the internet.

I stitch at home and on a laptop.

Take the Studio edition: every feature of the Complete edition, on three computers at once. Home, laptop, workroom, or the stitchers in the family.

I’m changing computers.

On the old one, open Help › Licence…, click Release this computer and confirm. Then install the software on the new one and activate the same key. If the old computer is out of order, write to us with your key: we will release the licence for you.

I bought the Essential edition. Can I move up to the Complete edition?

Yes, at any time: simply activate the Complete key, and the old one is released automatically. Nothing needs reinstalling.

My licence activation is refused.

Check that the computer is connected to the internet and that the key is copied in full, with no space before or after. If the message says the licence is already activated on another computer, release the old one first, or write to us.

Installation and help

How do I install the software?

Download the installer, double-click it (it is usually in your Downloads folder), choose the language, accept the licence agreement, then click Install. Two minutes later, the FFSMC Cross Stitch Lab icon is on your desktop and in the Start menu.

Windows shows “Windows protected your PC”.

Click More info, then Run anyway. This message appears for software from small publishers; it does not mean anything is wrong.

How do I update the software?

There is nothing to keep an eye on: when a new version comes out, a pink banner appears at the top of the software window. Click “See the new version”, download the installer and run it over the old version: your charts, your settings and your licence are kept. You can also check for yourself with Help › Check for updates.

How do I get help?

The illustrated user manual is built into the software: Help › User manual, or the F1 key. For anything else, write to [email protected] describing what you were doing, with a screenshot if possible: we reply within 48 working hours. The software version is shown in Help › About.

Made in Bergues, northern France

Cross Stitch Lab is designed and developed in Bergues by FFSMC, a small French company. Its creator first developed it for his wife, a passionate stitcher. Support replies within 48 working hours at [email protected].

What if your next embroidery started from one of your photos?

Seven days to try it, with every feature, on the photos that matter to you.

Try it free
ロード中...
トップに戻る